Spring Cake Pops Recipe: The Cutest Seasonal Treats You’ll Ever Make From Scratch
There is something about the first real weekend of spring that makes you want to bake something small, cheerful, and completely over-the-top adorable. Maybe you have a baby shower coming up, or Easter is around the corner, or your child pressed their face against a bakery window and looked at you like you hold all the answers. Whatever brought you here — this spring cake pops recipe is about to become the most-requested thing you make all season. And the best part? Once you understand a few key techniques, the whole process is far more manageable than it looks.
Table of Contents
Why a spring cake pops recipe belongs on your seasonal baking list
Cake pops occupy a rare space in the dessert world. They are single-serve, endlessly customizable, and somehow always manage to look like they came from a professional bakery — even when you made them on a Tuesday afternoon with your kitchen radio on. In the spring season specifically, their pop-of-color format is perfectly matched to the pastels and floral themes that define the months from March through May.
They work beautifully for Easter tables, Mother’s Day gift boxes, garden parties, spring birthdays, and bridal showers. They photograph exceptionally well. And because they are individual portions, there is no slicing, no serving, and no mess — just a tray of something genuinely lovely that people reach for immediately.
Ingredients for the ultimate spring cake pops recipe
Before anything else, gather your ingredients. Working with everything at room temperature is not just a suggestion — it is the difference between a batter that comes together smoothly and one that fights you the whole way.
The cake base
| Ingredient | Amount | Notes |
|---|---|---|
| All-purpose flour | 1½ cups (190g) | Sifted — lighter crumb |
| Granulated sugar | 1 cup (200g) | Caster sugar also works |
| Baking powder | 1½ tsp | Check it is fresh |
| Salt | ¼ tsp | Balances the sweetness |
| Unsalted butter | ½ cup (115g) | Softened, not melted |
| Eggs | 2 large | Room temperature |
| Vanilla or lemon extract | 1½ tsp | Lemon gives a spring-forward flavor |
| Whole milk | ½ cup (120ml) | Room temperature |
The frosting binder and coating
| Item | Amount | Notes |
|---|---|---|
| Cream cheese frosting | 3–4 tbsp | Store-bought is completely fine |
| White candy melts | 400g | Base for all pastel tints |
| Oil-based food coloring | A few drops each | Pink, lavender, mint, yellow — never water-based |
| Lollipop sticks (6″) | 24 sticks | Paper or plastic both work |
| Spring sprinkles / edible flowers | As needed | Apply immediately after dipping |
| Styrofoam drying block | 1 block | Holds pops upright while coating sets |
Ingredient tip: Always use oil-based food coloring for candy melts. Water-based coloring causes the coating to seize and clump — a frustrating mistake that is completely avoidable once you know about it.
Step-by-step spring cake pops recipe — from batter to display
Phase 1 — baking the cake base
- Preheat your oven to 175°C (350°F). Grease and line a 9×13 inch baking pan.
- Cream softened butter and sugar together for 3–4 minutes until the mixture is pale and noticeably fluffy — this step builds the air that keeps your crumb tender.
- Add eggs one at a time, beating well after each addition.
- Alternate folding in your flour mixture and milk, starting and ending with flour. Three additions of flour, two of milk.
- Pour into your prepared pan and bake for 25–30 minutes. A toothpick inserted into the center should come out with a few clean crumbs. Cool completely before moving on — a warm cake will make your mixture too wet.
Phase 2 — making the cake ball mixture
- Crumble your completely cooled cake into fine, even crumbs. Work through any large pieces with your fingers — uniform texture is what gives your cake pops that smooth, professional surface.
- Add frosting one tablespoon at a time, mixing by hand. You are looking for a consistency that holds a ball when pressed firmly — not sticky, not dry, not crumbling at the edges.
- Roll into 24 equal balls, roughly 30g each. A kitchen scale removes all the guesswork.
- Place on a parchment-lined tray and freeze for 15 minutes. Firm but not frozen solid is the goal.
Phase 3 — coating and decorating
- Melt your candy melts in the microwave in 30-second bursts, stirring thoroughly between each round. Never rush this — overheated candy coating turns grainy and unusable.
- Dip the tip of each lollipop stick about 1cm into the melted coating, then insert it halfway into a cake ball. This coating seal is what keeps your pop on the stick. Freeze for 5 minutes to set.
- Remove cake pops from the freezer and let them rest at room temperature for 5 minutes before dipping — this prevents cracking from thermal shock.
- Dip each pop fully into coating, lift out, and tap your wrist gently to let excess drip away. Rotate slowly as drips fall for an even finish.
- Add your spring decorations immediately — you have about 30–45 seconds before the coating sets. Stand each finished pop upright in your styrofoam block to dry completely.
Spring cake pop themes and decoration ideas
This is where your spring cake pops recipe becomes entirely your own. The flavor and technique stay the same — the theme is yours to choose.
Cherry blossom
Blush pink base, white petal details piped with a fine tip, yellow center dot
Garden butterfly
Mint green base, white and lavender piped wings, edible glitter accent
Easter chick
Yellow coating, candy eyes, a small orange triangle for the beak
Lavender bloom
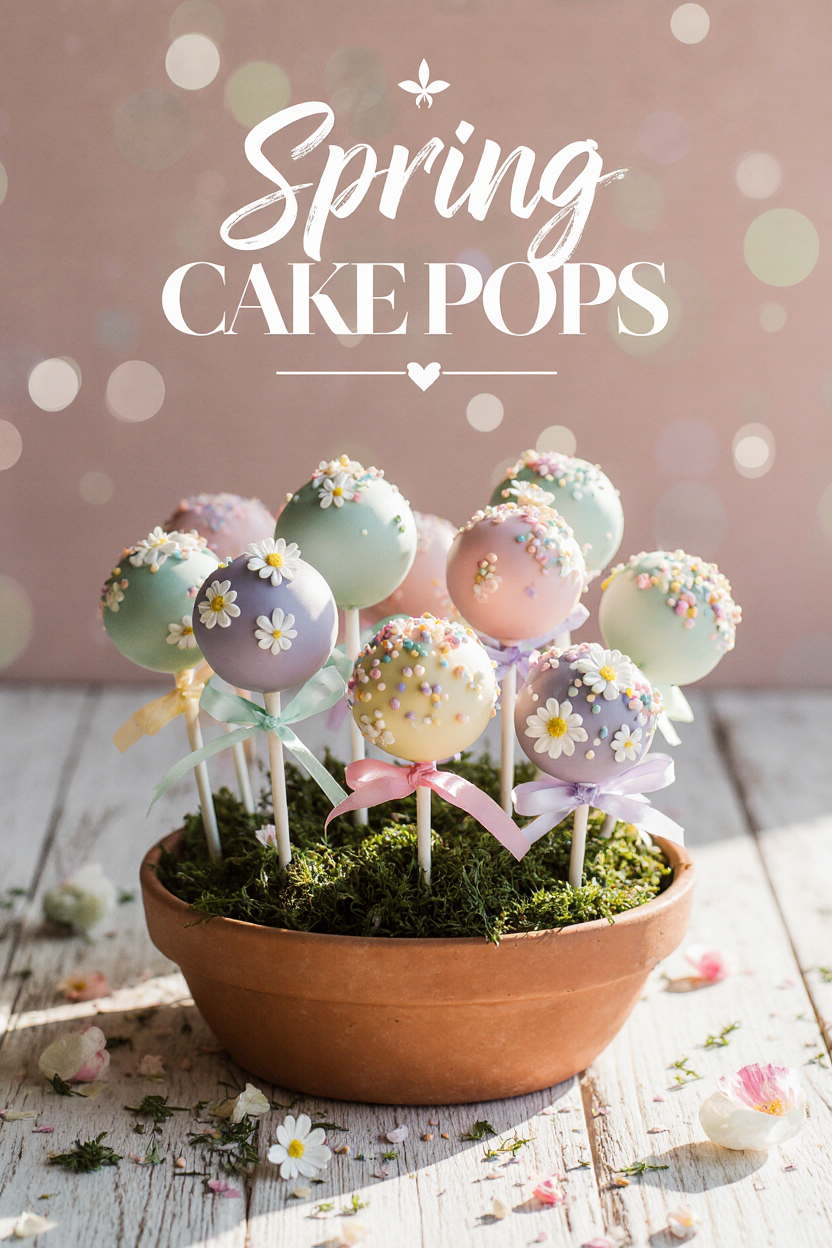
Violet base, white nonpareils, pressed edible flower on top
Bunny ears
White base, piped pink inner ear detail, small candy nose
Daisy field
White petals pressed into green base, yellow royal icing center
Spring color palette guide
| Spring color | Drops needed | Best used for |
|---|---|---|
| Blush pink | 2 drops rose | Flowers, baby showers, birthdays |
| Lavender | 1 drop violet | Easter, garden parties |
| Mint green | 2 green + 1 teal | Butterflies, leaves, nature themes |
| Butter yellow | 2 drops yellow | Chicks, daisies, sunny accents |
| Sky blue | 1–2 drops blue | Easter eggs, sky and cloud themes |
Fixing the most common spring cake pop problems
Even experienced bakers run into issues with cake pops. The good news is that every common problem has a straightforward solution — and knowing them in advance means you avoid the frustration entirely.
- Cake pops falling off the stick: Your cake ball has too much frosting, or it was not chilled long enough. Use less frosting and always pre-dip your stick before inserting it — that coating seal is non-negotiable
- Coating cracking: Your cake balls were too cold when dipped. Let them rest 5 minutes after the freezer before you start dipping
- Coating too thick: Add one teaspoon of coconut oil or vegetable shortening to your melted candy and stir — it thins beautifully without affecting flavor
- Colors bleeding into each other: You used water-based food coloring. Switch to oil-based only — it is the one rule that cannot be bent
- Bumpy surface: Your cake was not crumbled finely enough. Roll the mixture between your palms again until no lumps remain before shaping
How to store and gift your spring cake pops
| Method | Duration | Best practice |
|---|---|---|
| Room temperature | 2–3 days | Airtight container, away from direct sunlight |
| Refrigerator | Up to 1 week | Wrap individually in plastic first |
| Freezer (uncoated balls) | Up to 6 weeks | Thaw in fridge overnight before dipping |
| Freezer (fully decorated) | Up to 3 weeks | Single layer, airtight box only |
For gifting, wrap each pop individually in a clear treat bag and tie with a pastel ribbon. A small kraft box lined with tissue paper holds six perfectly and needs no further decoration. For party displays, stand your spring cake pops in a block of floral foam covered with moss for a garden-table look that photographs beautifully.
Frequently Asked Questions About the Spring Cake Pops Recipe
What is the best spring cake pops recipe for first-time bakers?
Start with a vanilla cake base, use store-bought cream cheese frosting as your binder, and coat with white candy melts tinted to pastel shades. Simple sprinkles do all the decoration work for you — no piping bag or artistic skill required on your first batch.
How far ahead can I prepare this spring cake pops recipe?
You can bake the cake base up to two days in advance. The uncoated cake balls freeze for up to six weeks. Fully decorated spring cake pops stay fresh in the fridge for up to a week, making them ideal for event prep without any last-minute stress.
Why does my spring cake pop coating crack?
Cracking is almost always caused by dipping cold cake balls into warm coating — the temperature difference causes the coating to split. Rest your chilled cake pops at room temperature for five minutes before dipping and the problem disappears.
What flavors work best in a spring cake pops recipe?
Lemon, vanilla bean, strawberry, coconut, and almond extract all carry a lightness that feels right for spring. They pair naturally with pastel coatings and feel more seasonal than heavier flavors like chocolate or cinnamon spice.
Do I need a mold for this spring cake pops recipe?
Not at all. The hand-rolled method works beautifully and gives you the same round shape without any specialist equipment. All you need is a baking pan, lollipop sticks, and a styrofoam block for drying — nothing that requires a trip to a specialty baking store.
Your spring table just found its centrepiece
A spring cake pops recipe is one of those rare baking projects that looks ambitious but rewards you well beyond the effort it actually asks for. You end up with a tray of something genuinely beautiful, completely delicious, and perfectly sized for every occasion the season brings. Follow the phases, lean into the pastels, and do not be afraid to make a theme entirely your own. The first batch is just the beginning — and by the second, you will be the person other people ask to bring dessert every single time.
Which spring theme are you making first?
Drop your chosen theme in the comments, tag us in your finished pops, or share this recipe with someone who has a spring event coming up. Your spring cake pops deserve to be seen — and so does your work.Save This Recipe →